Inhalt
This article explains how to use Uploadia, to upload information from Excel into Infor ERP XA. Uploadia uses the public API of Infor ERP XA that is System-Link to create transactions in XA. Uploadia supports only IDF transactions, i.e. any transaction/action (Create, Update, Delete) that a user can process in Power-Link or Net-Link. All of these transactions can be done via Excel using Uploadia. This includes both standard Infor XA Objects with or without extensions and user created objects in Enterprise Integrator.
Excel file formatting & requirements
Uploadia can work with the following Excel file formats:
- .xslx
- .csv (since version 1.5)
The following formatting is required in the spreadsheet:
- The first row of the Excel Sheet must be the column heading
- Numeric values must format as number without a thousand separator
Here is an example of a well formatted Excel spreadsheet:

Accessing Uploadia
Uploadia is a web application, which can be accessed with Firefox or Google Chrome. Other Chromium based browsers like Microsoft Edge should also work.
There is no need to install any other software on your computer to use Uploadia.
The URL to access Uploadia depends on the setup in your company, and it will be provided by your IT staff.
Usually it is something like: http://<Uploadia_Server_Name>:20800/uploadia
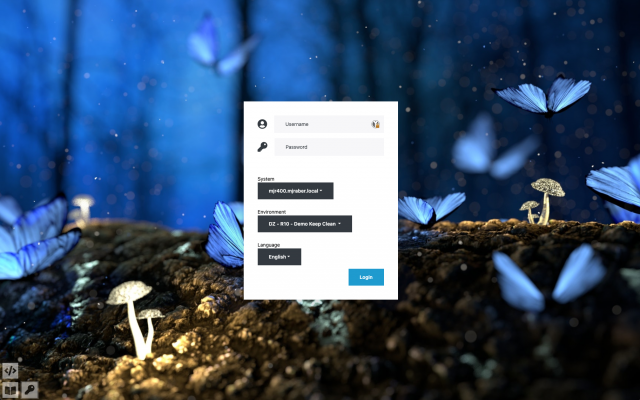
You reach out to the login page:
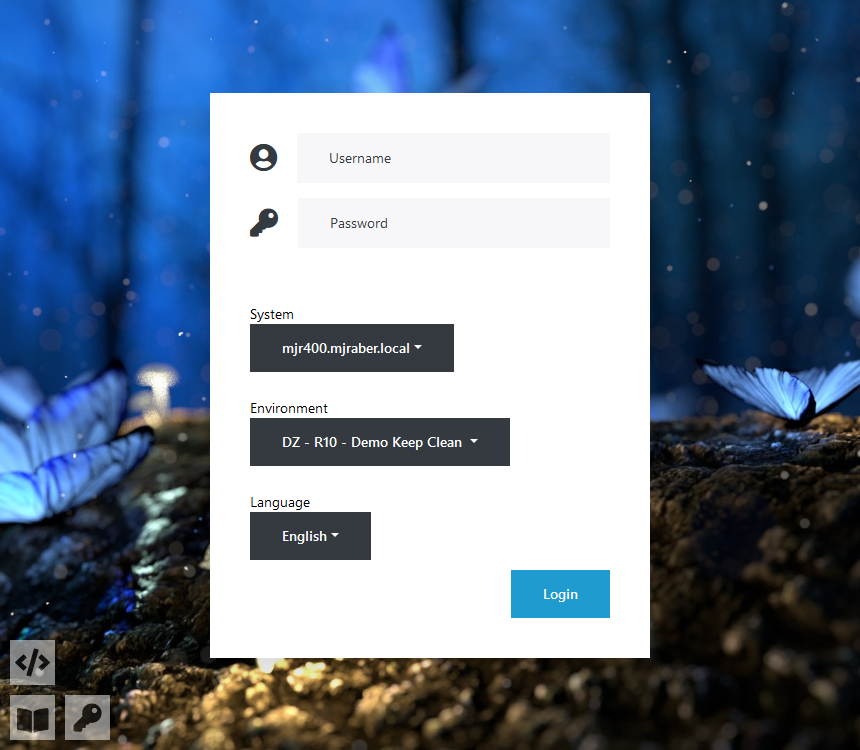
Use your Infor XA user and password and select the system and environment from the available options, to login to Uploadia.
All authentication and authorization for Uploadia is managed by the usual IBM i, Infor XA Cross Application Support and Enterprise Integrator security. This means, that the users are able to do the same things in Uploadia, as they can do in Power-Link or Net-Link.
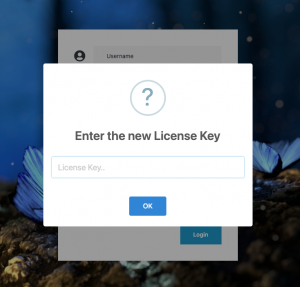
Enter license key to Uploadia
Once Uploadia is installed, a license key is required. The license key is provided by MJR GmbH, for this, the full qualified domain name of the AS400 / IBM i and the environments are required. Every generated license key must be renewed annually. Uploadia will provide advance notice that the license key is about to expire 30 days before expiration. It can then be renewed by sending an email to [email protected].
The key can be placed here in this field:
Uploadia main page
Upon successful login, the user is presented with the main page of Uploadia:
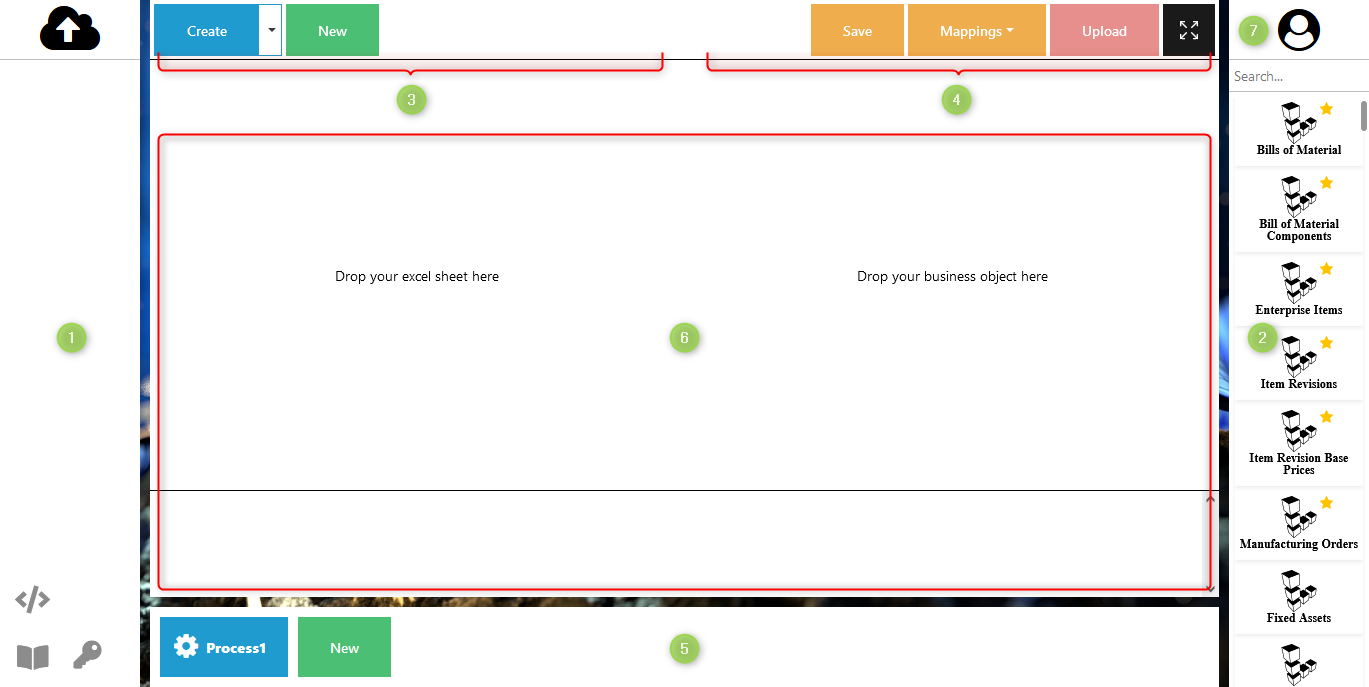
Here is an explanation of each section or option:
- Contains the Excel file drop zone. You can upload Excel file by drag and dropping them into this area. It also has the cloud button at the top that can be used to select a file using File Explorer.
- Lists all business objects available in this XA environment. This also includes custom developed objects, not just the default object from XA. There is a full text search option to look for business objects by name, object class, domain class, etc.
- Allows you to select which transactions you want to perform in XA. Available options are create, update and delete.
- Here, you can save a mapping or load a mapping that was previously saved. When the mapping is finished, you can start the upload with the red button.
- At the bottom you can switch between your processes or create new one, each process is an upload to XA. You can have as many of them as you want, and they can run independent of each other.
- This is the mapping area that is used to map excel columns with business object attributes. You can drag and drop Excel sheets from the right side and business objects from the left side into this area. Then you can map the columns and attributes also with drag and drop. The mapped entries will appear at the bottom and be removed by clicking on them.
- In order to display session details and logout from Uploadia, click on the user button at the top right.
Getting started
This manual will cover two scenarios to illustrate the use of Uploadia:
- Example 1: Item revision base price upload – simple upload into a single business object.
- Example 2: Bill of material upload – complex upload, populating header and detail from a single Excel sheet in one process.
Example 1 – Simple upload – Item revision base prices
Video – Item revision base price
The following video is a demonstration of this example:
Sie sehen gerade einen Platzhalterinhalt von YouTube. Um auf den eigentlichen Inhalt zuzugreifen, klicken Sie auf die Schaltfläche unten. Bitte beachten Sie, dass dabei Daten an Drittanbieter weitergegeben werden.
Step 1: Excel file
The following Excel sheet will be used for this upload:
There is no requirement for the order of the columns. It would also work to have some columns in between that are not relevant for Uploadia.
Step 2: Mapping
Once logged into Uploadia the Excel file is uploaded by drag and dropping it into the Excel drop zone:

Now you see the sheet which was inside the Excel file that was uploaded. In case the Excel file has multiple sheets, they are all available here.
Search for the business object to use on the right side, in this case item revision base price. Drag and drop both, the Excel sheet and business object, into the mapping area in the middle.
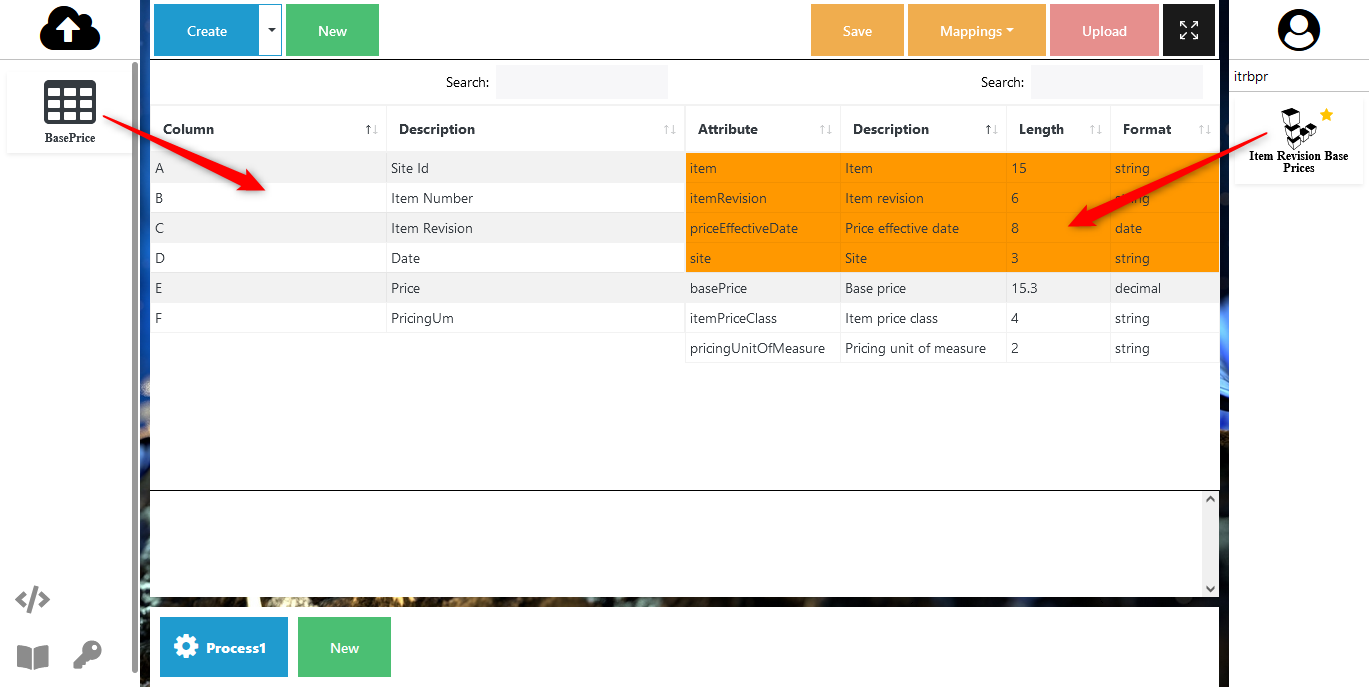
This will fetch the available attributes from XA and load the columns from the selected Excel sheet. The orange rows on the XA side are the key attributes from the business object.
Do the mapping by dragging the Excel columns and dropping them onto the relevant business object attribute.
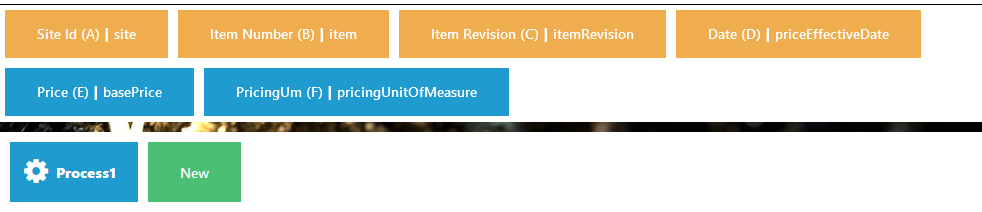
For example, column A (Site Id) is mapped to attribute site.
Hints:
- Uploadia provides a full text search to look for business object attributes and excel columns in order to facilitate the mapping process. This is especially useful for bigger Excel files and business objects with more attributes than in this example.
- If an Excel column is mapped incorrectly, simply click on the mapping and it will be undone. You can then map the Excel column again as needed.
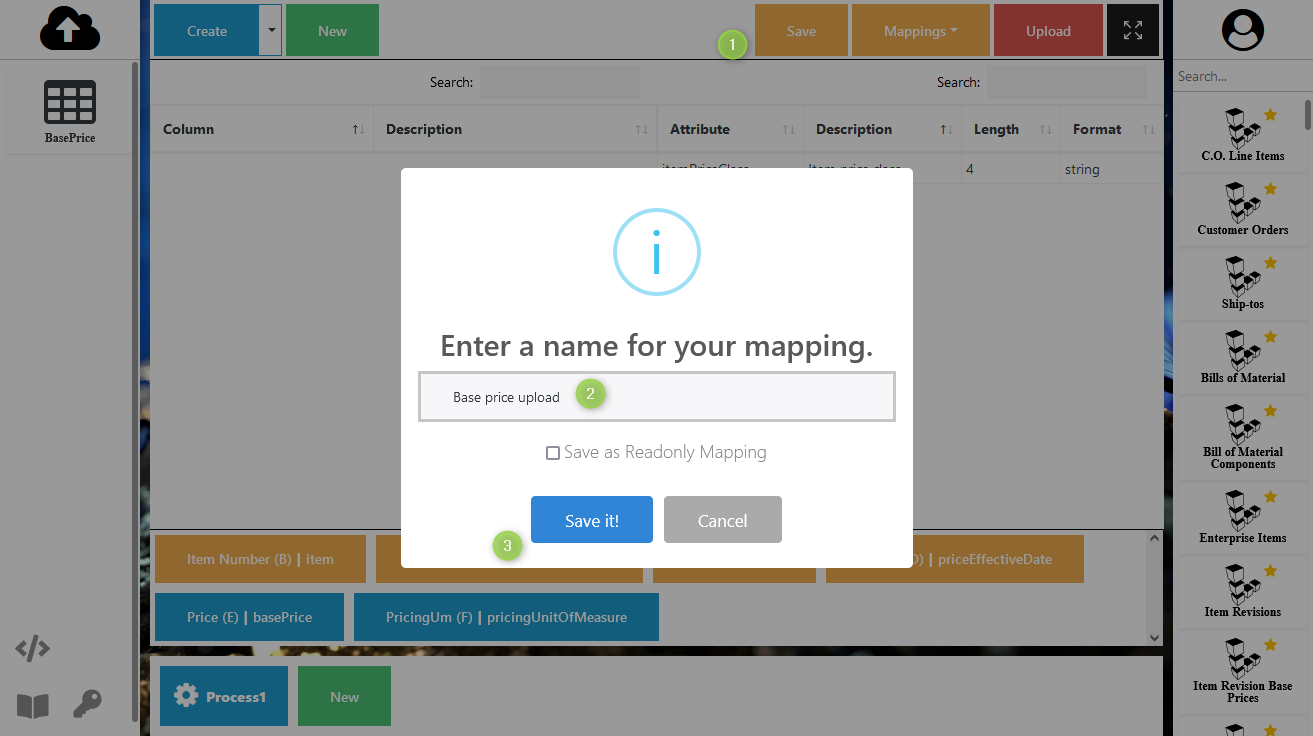
Step 3: Save the mapping
Save the mapping, if you want to reuse it another time to upload information from the same excel layout.

The option „Save as Readonly Mapping“ would prevent changes on uploads where this mapping is used. This could be useful for mappings which are shared with other users.
The new mapping is now saved and available in the mapping dropdown:

It can be deleted by click the small trash bin in front of the name.
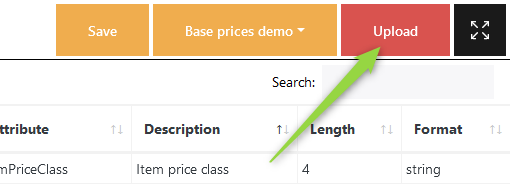
Step 4: Start the Upload
Start the upload by clicking the upload button in the top right:
Uploadia will now display the data from the Excel sheet and starts the upload into XA using System-Link: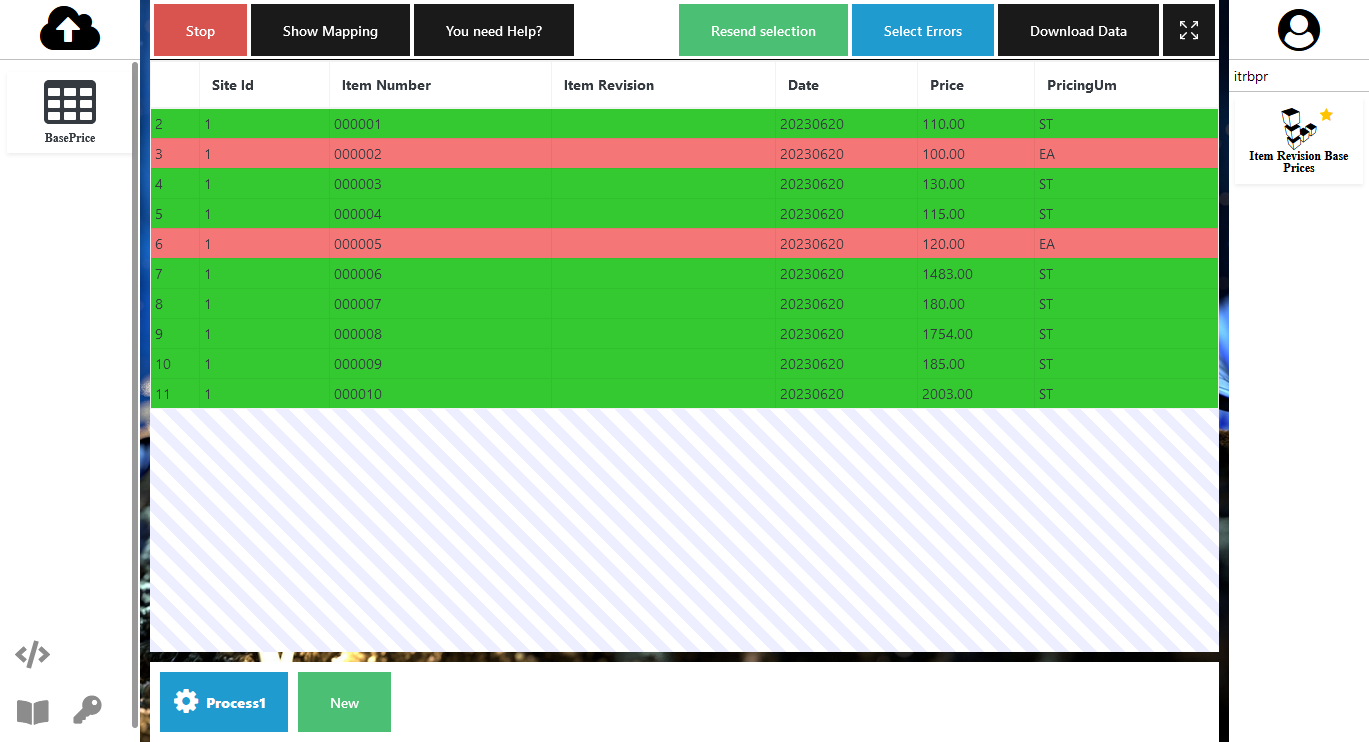
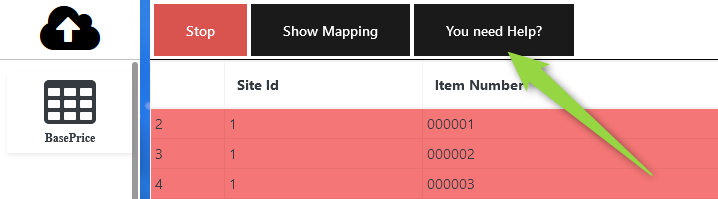
The spinning gear at the bottom indicates, that the upload is still in progress. The rows get coloured in green when the upload was successfully and in red when there was an error.
The error message can be displayed by clicking on the failed row:

In this case, the price unit of measure was not valid for this XA environment.
The following two options are available to fix the issue:
- Correct the data in the Excel file, reupload and reprocess it. This is recommended, when you have a lot of errors.
- Change the data in the Uploadia application. This is recommended in case of small issues or typos like this one.
Step 5: Fix errors
To fix the data in Uploadia just double-click the cell you want to change:
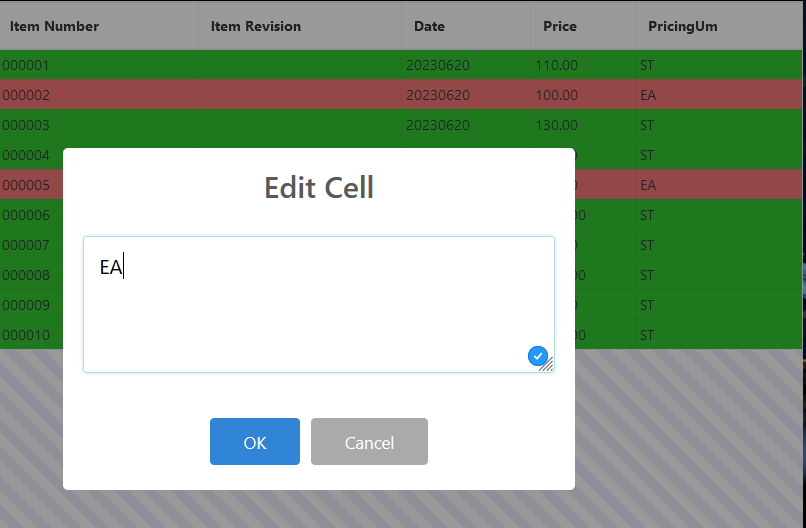
This will bring up a dialogue where you can edit the cell value.
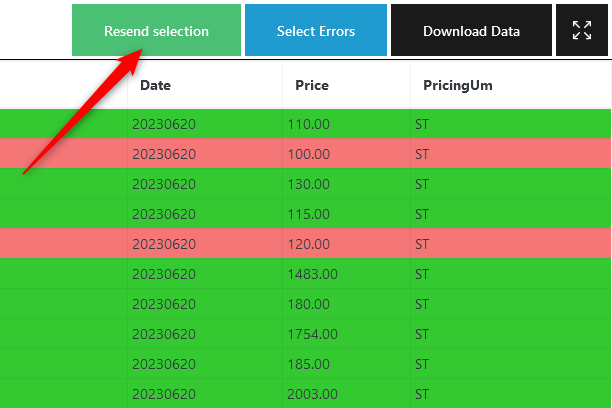
Once all wrong values are change, the rows need to be reprocessed. Select all affected rows, you can select multiple rows by pressing shift or control on your keyboard. Press the button „Resend selection“, to reprocess all selected error rows:
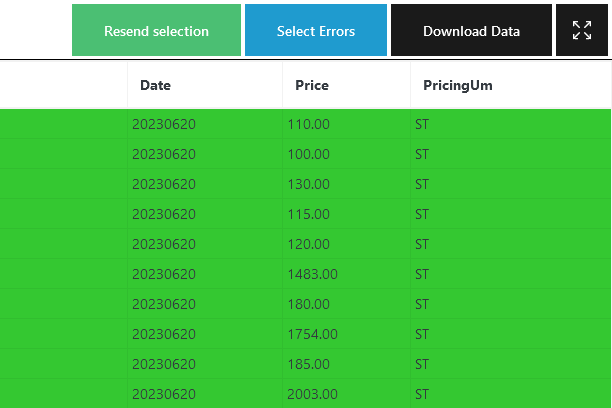
Here is the result, the two row where reprocessed successfully:
Step 6: Result in XA
This is the result in XA, the prices are uploaded as intended:

As Uploadia is using System-Link, everything is available in the Maintenance history under the name of the user how was logged into Uploadia:

Example 2 – Complex upload – Bill of material
The creation of BOM’s (bill of materials) in XA involves 2 business objects, bill of material (header) and bill of material component (detail). This is also possible in Uploadia with a single upload.
Video – Bill of material
The following video is a demonstration of this example:
Sie sehen gerade einen Platzhalterinhalt von YouTube. Um auf den eigentlichen Inhalt zuzugreifen, klicken Sie auf die Schaltfläche unten. Bitte beachten Sie, dass dabei Daten an Drittanbieter weitergegeben werden.
Step 1: the Excel file
The following excel sheet will be used for this upload:
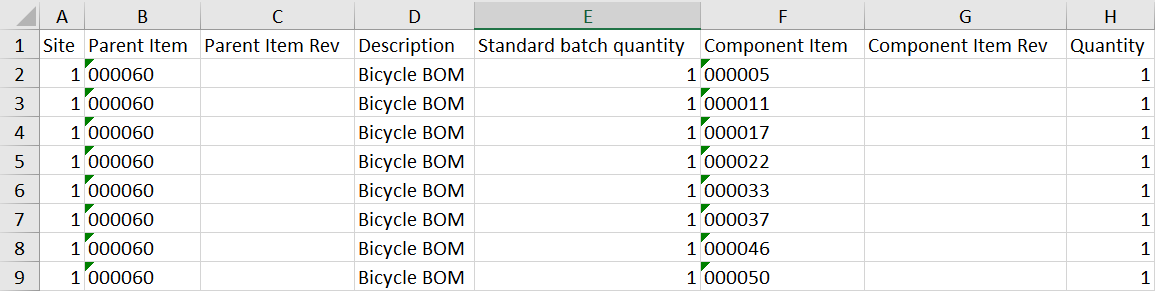
The data from column A to E is the bill of material header, and from column F to H are the BOM components. In total, this is one BOM with 8 components. It would also work to have multiple BOM’s with multiple components in the same Excel sheet.
It is not required to have the columns in order of the XA hierarchy, the columns between header and components could also mix. Even though this is not recommended, as it could lead to confusion.
This process is also not limited to just 2 levels (header and detail), you can have as many detail levels as you want.
Step 2: Create Mapping
Once logged into Uploadia and the Excel file is uploaded, the finished mapping looks like the following:
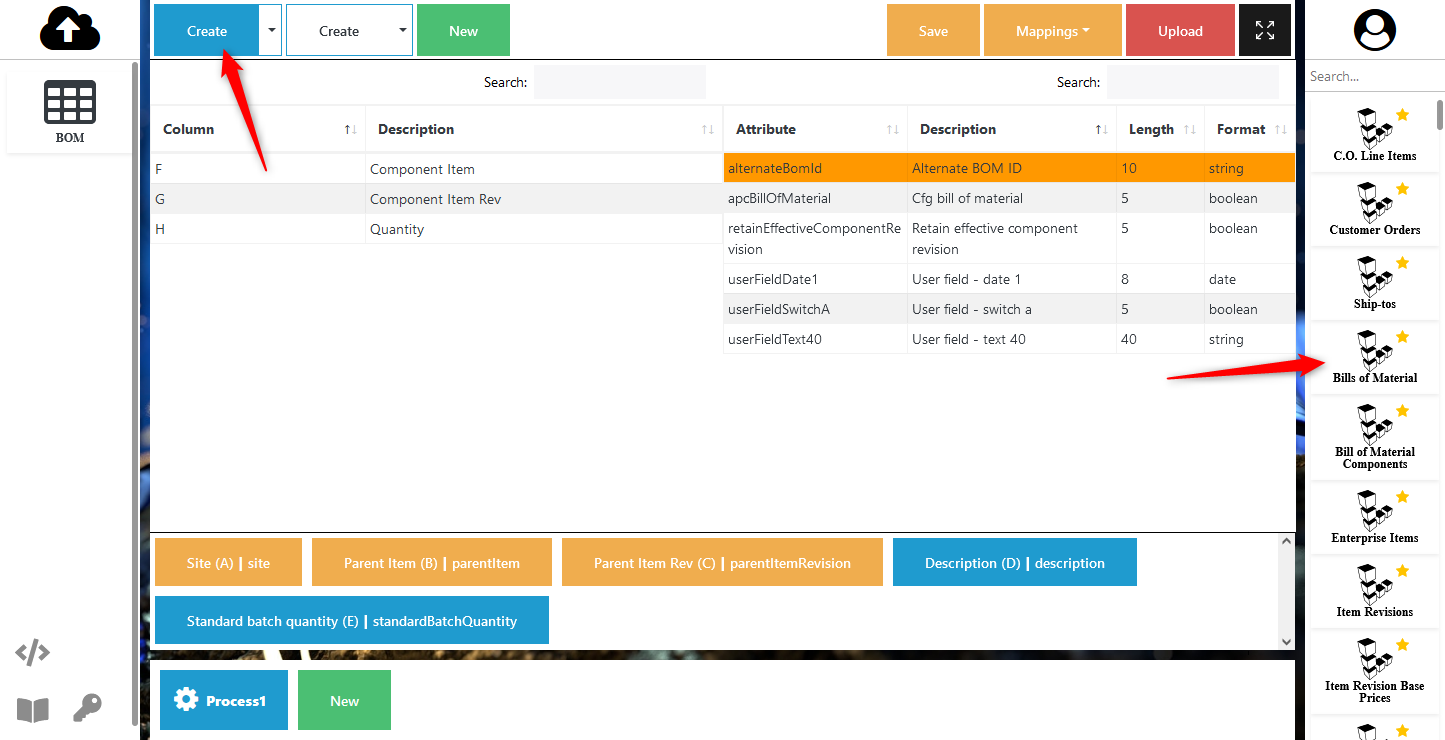
This mapping contains two transactions, the first one is to create the BOM header and is mapped with columns A to E.
The new button at the top was used to create a new transaction for the BOM component creation, in the same process. Once the second transaction was created, the business object BOM components were drag and dropped from the right side (business object list) to the mapping are:
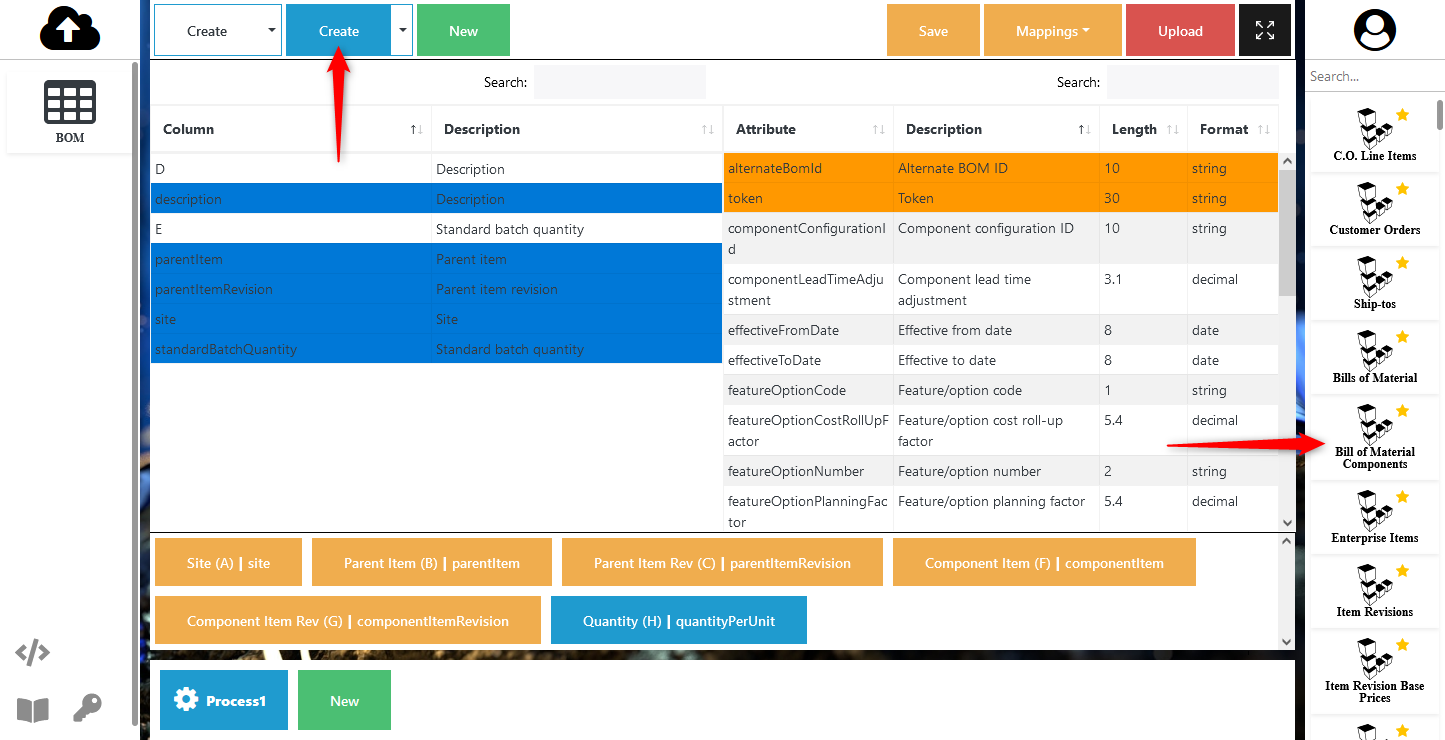
This mapping for the second transaction was done from Excel file columns F to H. On the Excel columns side, only the white rows were used for this second mapping. The blue ones were ignored, they will be explained in another chapter.
Step 3: Start the Upload
If required, this mapping can be saved for later reuse. There is no difference between saving mappings with one or multiple transactions inside.

Once the upload was finished, the rows turned green, so no error while the upload.
One important note here is, that the bill of material header and the BOM components were processed, as one transaction group. This means, that any error on, for example, a component line would cause the whole BOM creation to fail. This is important, as it prevents that you get invalid data into your system, which you would need to clean up. In case the Excel sheet has multiple individual BOM headers, each with multiple components, every BOM header would get one transaction group and is independent on from the errors of another BOM header.
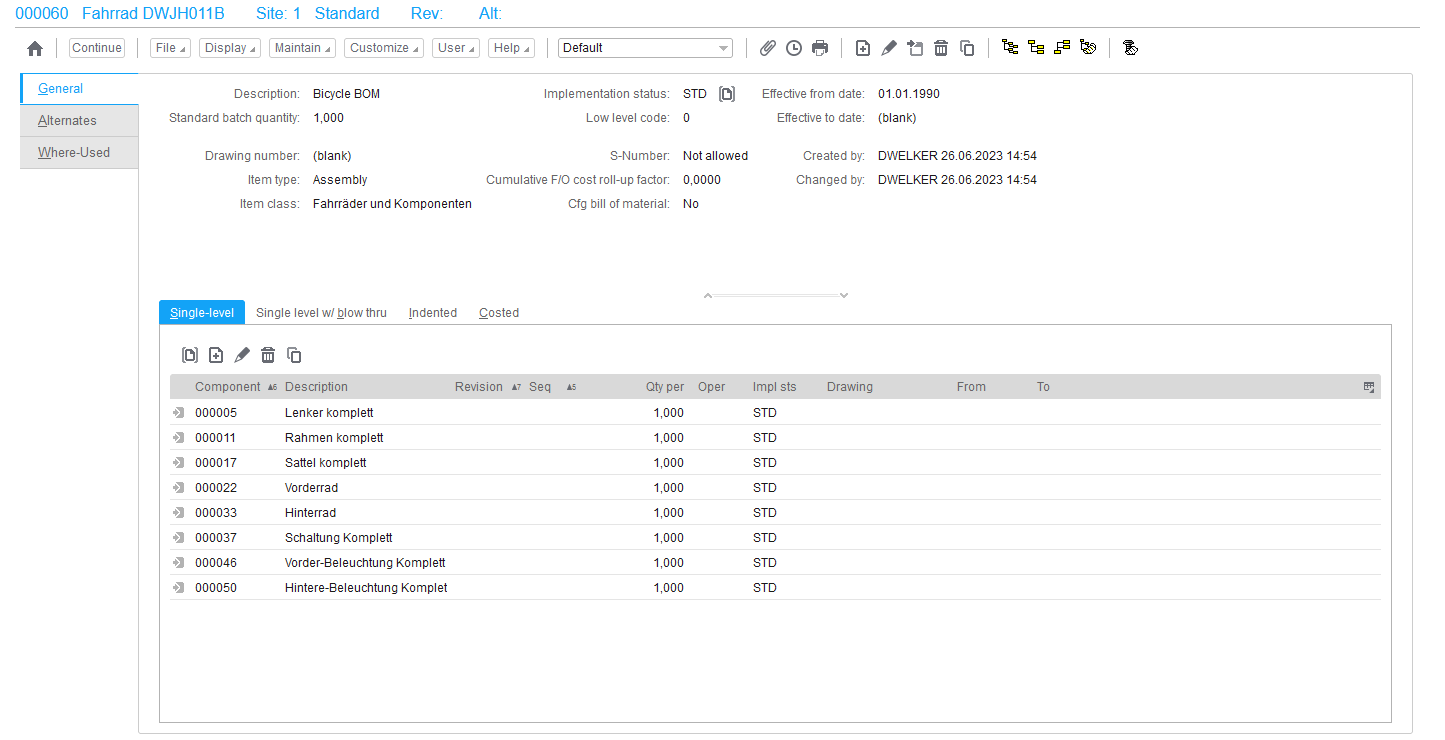
Step 4: Result in XA
This is the result in XA, when the new BOM was uploaded:
How to change item revision controlled attributes with Uploadia
Within Item revision there are several Controlled Attributes available. These fields must be changed for all item revisions in a site and cannot be changed for only one Item Revision. So it is not possible to do an normal update on these attributes.
They are:
- Batch/lot control
- Discrete allocations
- Inspect on receipt
- Inventory code
- Item type
- Quality control
- Shelf life in days
- Stocking UM
The following is the solution to change these attributes via Uploadia.
Use the following domain class in Uploadia to update a controlled attribute: „com.mapics.epdm.ChangeItemRevisionsTransactionTxn“
Do not select „Update“, the transaction needs to be „Create„.
Now map at least the keys and additional all attributes you like to update.
In this example we are changing the Inspect on receipt flag:
Work with Mappings
Save a mapping
Once you have finished the mapping between your excel file and the business object from Infor XA, you can save the mapping.
This allows to reuse the mapping later with the same Excel file or another file that has the same column layout.
Saved mappings are only available for you, other users in Uploadia can’t access them. Your saved mappings are available in all XA environments. It is recommended to create and test them in the test environment of Infor XA and then use them in the production environment.
Do the following to save a mapping:
- Click the save button on the top right.
- Enter a meaningful name.
- Confirm it by clicking the „Save it!“ button.
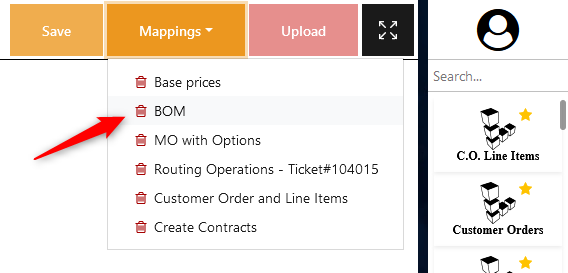
Load a mapping
First upload the excel file you like to use with the mapping. It should have the same column layout as the original file, that was used to create the mapping.
Then click the button called „Mappings“ on the top left and select the mapping you like to load:

Delete a mapping
Mappings are private to users and can be deleted by them. To delete a mapping click the “Trash Can” icon next to the mapping:
Share mappings with other users
The Uploadia mappings are saved individually per user. Right now, there is no option to share them in the Uploadia UI, but you can copy them to other users manually. This is usualy be done by the system administrator.
The mappings are saved on the following location in the IFS: /Uploadia/UploadiaData/mappings/<System>/<User>/
In this folder is one file per mapping with the name of the mapping. To copy a mapping to another user, just copy the mapping-file from one users directory to another one.
There is no Uploadia restart required and the user don’t need to relogin. The mapping will appear directly.
Uploadia CLI
The Uploadia command line interface (CLI) can be used to start uploads without opening the Uploadia web application. This is useful if the Excel file and the mapping are already prepared and the upload should be started directly from another application or script.
The CLI uses an existing Uploadia mapping file in JSON format and creates a result CSV file with the processing details.
Video – Uploadia CLI
The following video is a demonstration of this example:
Sie sehen gerade einen Platzhalterinhalt von YouTube. Um auf den eigentlichen Inhalt zuzugreifen, klicken Sie auf die Schaltfläche unten. Bitte beachten Sie, dass dabei Daten an Drittanbieter weitergegeben werden.
Prerequesits
Before running the Uploadia CLI, the required files need to be available on the system where the command is executed.
The following files are required:
the Excel file with the data to upload (.xslx, .ods or .csv)
the mapping file from Uploadia in JSON format.
the output path for the result CSV file
The mapping used here are the same mappings as Uploadia is storing when saved by a user in the web application. They can be found in the following location in the IFS: /Uploadia/UploadiaData/mappings/<System>/<User>/ In this folder is one file per mapping with the name of the mapping. It is recommended to test the mapping first in Uploadia before using it in the CLI.
This files need to be availabe on the system where Uploadia is installed. In many installations this is the IBM i system, so the files need to be available in the IFS.
The command
The Uploadia CLI is started from a command line terminal, for example QSH on IBM i.
A command call contains the file information for the upload, the XA login data and the output path for the generated result file.
Example:
/Uploadia/UploadiaApp/bin/startUploadia.sh
--i="/clidemo/baseprice-example.xslx"
--n=BasePrice
--m="/clidemo/Item Revision Base Price.json"
--o="/clidemo/result.csv"
--u=user
--p=password
--e=environment_code
--s=system_name
--l=en
The parameters have the following meaning:
--iInput file, Excel file with the data to upload--nName of the sheet to process in the Excel file--mMapping file from Uploadia (JSON)--oOutput file with the result of the process, created by Uploadia--uXA login: Username--pXA login: Password--eXA login: Environment--sXA login: System name--lXA login: Language (en,de, …)--hShow the help
All options except --h are mandatory.
The CLI processes the selected Excel sheet based on the provided mapping and sends the data to XA using the specified login information.
Check the result file
After the command was executed, Uploadia creates the result CSV file.
This file contains the processing result for each row and shows whether the row was transferred successfully or if an error occurred.
If rows contain errors, the result CSV can be used to identify the affected rows and review the corresponding error details.
Troubleshooting
If your System Link Server (SLS) crashes while Uploadia is processing your Excel file, the maximum memory setting needs to be increased. This setting depends heavily on the general load of your system and the SLS, so there is no perfect setting for everyone. However, we recommend that you set it to at least 2GB if you are experiencing problems.
Support for technical issues
Please contact your support in case Uploadia is not working properly or you have any other technical issue.
Send a mail to [email protected] or use our helpdesk to open a ticket.
Use the button „You need Help?“ in Uploadia (available once you started the upload) to generate a report and send this to us. This will help us to solve your issue faster.